Research Updates on Powdery Mildew Control in Cannabis

Thursday, November 10, 2022

  Zamir K. Punja from Simon Fraser University presented at the Canadian Greenhouse Conference this October where he discussed powdery mildew management on greenhouse crops. Cucumbers and cannabis were the focus of this presentation as they are both high value crops grown in a large portion of Canada’s greenhouses. In addition, both these crops are susceptible to powdery mildew infection and management tends to be tricky.  

How does Powdery Mildew Spread? 

Spores spread in the air by workers of by infected plants, and they can survive for up to a week. In humid conditions (70%) the spore then germinates producing a germ tube and haustoria. The mycelium then develops, and eventually more spores are produced. This happens within 5 to seven days. Overall mildew development is favored by warm dry conditions. 


Text Box


Text Box


Powdery mildew management using Bacillus species as a biocontrol agent 


Bacillus spp. reduces powdery mildew development in a variety of ways which include: 

  • Inhibiting fungal growth by producing lipopeptides  
  • Produces endospores  
  • Display broad-spectrum activity against fungi 
  • Produces lytic enzymes that can destroy fungal cell walls  


There are currently no synthetic fungicides registered for cannabis. To minimize damage cause by powdery mildew growers, apply vaporized sulphur (except organic), hydrogen peroxide (Zerotol) and potassium bicarbonate (MilStop). In addition, Regalia may induce resistance to powdery mildew. Other practices include using UV-C light and a physical means of control.  


A group of green leaves

Description automatically generated with low confidence 

Figure 1. Effect of treatments on Powdery mildew in cannabis after weekly applications were made for 4 weeks. Photo taken from Zamir K. Punja’s presentation at the Canadian Greenhouse Conference.  


In this trial Rhapsody (Bacillus subtilis), Regalia Maxx, and MilStop were applied prior to viable mildew infection and were tested for 4 weeks. Both MilStop and Regalia provided good control of powdery mildew, with Zerotol and Rhapsody providing less control. MilStop and Regalia application resulted in the collapse of mycelium in the infected leaves. 


In addition to evaluating the efficacy of registered biological controls on the market, Zamir wanted to experiment with the use of UV-C light for controlling powdery mildew. In this Trial CleanLight Pro Unit UV-C Light was used for 3-5 seconds daily at approximately 3-6 mJ/cm2. UV-C radiation reduced mildew development but can be difficult to implement in a commercial setting.


For the complete slide deck from Zamir's presentation, click here.


Posted by: Talia Plaskett

Preparing for Fiona

Friday, September 23, 2022

 Hurricane Fiona is predicted to make landfall in Nova Scotia Saturday September 23rd. It is anticipated that it will have a significant on all parts of the province. 


Crops that are most vulnerable to weather extremes can be prioritized in order to save as much of the crop as possible. Consider postponing seeding new plantings or cover crops in the days leading up to a significant storm. Wind and pounding rain can cause erosion and flooding, which could easily dislodge tender seedlings or wash away the seed altogether.

Preparing Your Greenhouses

Greenhouse or high tunnel structures can be dealt with in a couple of different ways in the face of an impending storm, both with their advantages and disadvantages. If there is an option to remove the plastic from a structure, the chance of structural damage can be significantly reduced. While this would expose the crops beneath, and could result in crop damage and loss, your main structure can be saved. It is a difficult decision to make, but ultimately compare the value of the crop to the value of the structure itself. 

If removing the plastic isn’t an option, make sure everything is sealed up as much as possible to prevent the wind from tearing things loose. Latch and brace doors and vents, and tie the sides of tunnels down tight. Most structures will have a rating for maximum wind speeds they can withstand. Take into consideration any shelter/exposure provided by the topography of your farm as well as the up to date weather forecast to help make an informed decision. 

It is also advised to unplug electrical equipment where possible to prevent a surge once power returns, and ensure that drainage systems are cleared and ready for large volumes of water. Make sure that the area surrounding the greenhouse is clear of items that could be picked up by the wind, and that any weak/old overhanging tree branches have been removed. 

If you have a generator, make sure you have plenty of fuel and that it’s in an accessible place. If you don’t have a generator and require power for your watering system, make sure to give the crop a good water before things get going. Its always a good idea to try and have some water set aside in barrels in case of emergency.

The Aftermath

Besides damage by wind and heavy rains, disease issues can be a big consideration after a storm event. Heavy rain can splash fungal spore or bacteria-containing soils around, facilitating the spread of infection. Crop protectant products may be washed away, leaving the plants vulnerable until they can be sprayed again, if at all. Wind and rain may cause physical damage to the plants themselves, causing them stress and areas of damage where infection can move in. High winds sweeping up the coast may even carry insects from elsewhere, resulting in a flush of insect pressure that would otherwise be unexpected. It is important to scout your remaining crops as soon as possible after a storm has passed so that there is opportunity to mitigate any pest pressure brought on by or worsened by the weather.

In the meantime, keep track of the forecast and plan ahead as much as possible. Stay safe everyone

Looking at Leachate - what are my EC, pH and volume telling me?

Thursday, August 18, 2022

Production systems based in soilless substrate require close attention to the fertigation solution going in, as well as what is coming out. Monitoring the EC, pH and % volume allow for corrections that will solve a whole slew of problems before they happen (nutrient deficiencies, salt buildup, root rots, low yield etc), saving the producer a lot of time, money and remediation efforts. 

pH

It is important to observe the pH of your leachate, that is the solution that is draining out of your pot after an irrigation event. pH is largely tied to nutrient availability. While we might be feeding the crop with a solution that is on target, the substrate can be a bit of a confounding factor. Looking at the drain that comes out of the pot is a good way to get an idea of what is happening in your growing matrix. A pH that is significantly higher or lower than what you are feeding the plants is an indication that there is something happening to your nutrient availability in the substrate, and that you may be at risk of nutrient deficiency in the crop. Different substrates (pine bark vs coir vs peat) are going to have different baseline levels of acidity, which will impact the interactions between the plant and the irrigation feed. 

Target value is typically between 5.0-5.8, depending on your substrate and the crop you are looking to grow.

EC

The EC of your leachate solution will give you an indication of the salt level in the substrate. While we know the EC of our feed solution, it is important to directly compare with what we are getting after the plant has been fed. An extremely low EC value in the drain sample indicates that there is very low salt in the substrate, and that the plants likely require a higher EC in the feed solution to make sure that the plants are getting all of the nutrients that they need. A high EC value indicates a high concentration of salts in the substrate, and action should be taken to either flush the pots with straight water (depending on how high this value is) or reduce the EC of the feed solution to bring the growing media back to a more balanced nutrient content. 

Target values should be 10-25% higher than your feed solution. A feed EC of 1.5, and a drain EC of 4 indicates there is a problem with salt accumulation in the pot. 

Volume


The volume of liquid that drains out of your growing container/bag is a good way to monitor if your plants are getting sufficient water. Leachate is a necessary evil for substrate production, especially when supplementing with synthetic fertilizers. Without leachate, there is nothing to pull excess salts from your media, and these will accumulate over time and impact the nutrient balance in the substrate. Ideally the leachate sits between 10-20% of the total volume that was fed to the crop. If you find that your drain is lower than this percentage, it is recommended to increase the amount of water fed to the crop. 


Photo 1. Here is an example of a very basic leachate collection container. It is important to collect the drainage from a series of pots that are representative of the crop. That means that your monitoring station should not be raised up above the rest of the pots, as your sample is now going to dry out faster than the rest of the plants, and lead to overwatering due to a response to the measured values.

How can I monitor this?

Keeping an eye on your irrigation solution is easy to incorporate into a daily routine. Ideally you are monitoring the volume of water coming out of your emitters, in addition to the amount of water draining out of the pot. It is best to set out your collection bins before the first irrigation event of the day, and collect/assess that solution 24 hours later, before the first irrigation event of the following day. This 24 hour period will take fluctuations in your irrigation volume into account - the amount of water draining from your pot after the first irrigation event of the day should be little to none. The amount draining from the pot at 2 pm on a hot sunny day is going to be quite a lot. 

                                Photo 2. A basic example of a drip irrigation monitoring setup. Photo credit: Talia Plaskett

In terms of equipment, basic plastic containers are all you need to collect the drain solution. To set up a drip monitoring station, be sure to install an extra dripper along your irrigation line that can feed directly into your monitoring station. After that, you will need an EC/pH meter, as well as something to measure the volume of liquid. And last but not least, a notebook or form of electronic record database, to record the values you observed. 

For more information on irrigation management:
Posted by: Talia Plaskett

VPD Calculator

Friday, July 22, 2022

The relationship between temperature and humidity is extremely important when maintaining water movement through the plant. This relationship is referred to as vapour pressure deficit (VPD; measured in kPa) which compares the amount of moisture in the ambient air, to the amount of moisture in the air surrounding the plant. It is a driving force for transpiration and determines how quickly or slowly the moisture moves out of the plant. Ambient air that is low in moisture is going to draw a lot more water through the plant compared to ambient air with high humidity. The rate that the water is pulled out of the plant's stomata is linked to the amount of water pulled through the stem and up from the roots. The faster you pull moisture through those leaves, the more readily water needs to be replenished in the root system.   

High VPD

  •  low moisture content in the ambient air
  •  big difference in moisture content between the air and the plant
  • water is rapidly pulled from the plant leaves, putting pressure on the roots to transport more water

Low VPD

  •       high moisture content in the ambient air
  •       small difference in moisture content between the air and the plant
  •       water is not pulled from the plant as quickly
  •       more vegetative plant

How do I know where I stand?

Dr Greenhouse has formulated a cannabis-specific calculator to help determine where you stand when it comes to your vapour pressure deficit! By plugging in the known temperature and humidity for your grow space, the calculator will let you know if you are on track with where you should be!

The chart posted on the website can be used to help visualize the energy relationships of moist air. By maintaining a VPD in the target zone (shown in green in the chart below), you can rest assured that the air-water relations have been optimized within the plant and discourage vegetative crop growth. Once you start steering towards the danger zones on either side, an adjustment should be made to get back into the target zone. Fluctuation in temperature or humidity is okay as long as the appropriate adjustments are made to keep the system in balance!

Posted by: Talia Plaskett


Nutrient Deficiency Diagnosis

Friday, June 24, 2022

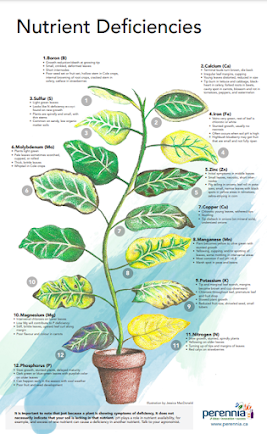
Abiotic and biotic stresses can be difficult to diagnose. The location on the plant, the symptoms observed, severity and speed of onset, and the distribution across the room are all important things to consider when trying to figure out what is happening in the crop.

Bloomlabs.ca has an awesome fact sheet that helps to guide your diagnostic process as to what could be happening in the crop. For access to the factsheet, click here!

Below is a screenshot of page 2 of the document, which illustrates what these nutrient deficiencies typically present as. The side by side comparison of foliar symptoms can be very helpful in pin pointing the culprit in each specific instance. Understanding the mobility of the nutrients is also important in your process - something like Nitrogen, which is mobile through the plant, can easily be re-located to new growth to ensure that it is able to develop properly. That is why nitrogen deficiency typically presents as yellowing of leaves towards the bottom of the plant, as opposed to the top of the plant. 

While nutrient analysis is highly recommended throughout the cropping cycle, those nutrient levels alone might not be telling the whole story. Nutrient availability is highly dependent on the pH of the solution and the growing media. While you might be actively supplementing a nutrient or a micronutrient to your crop, and having your nutrient analysis coming back with sufficient levels of nutrition, interactions within the growing media might be causing inaccessibility of that particular nutrient to the plant roots. Understanding the interaction between your added nutrients, as well as the EC and pH of the substrate and feed solution, should help level out surprise nutrient deficiencies, and allow for more accurate and effective applications of nutrients. Pairing a tissue test alongside your substrate and water analysis should give you a full picture of what is happening within the crop and allow for manipulations to maximize your growing potential. 

Looking for more information on nutrient availability and diagnosis of deficiencies? Don't hesitate to reach out to discuss!


Posted by: Talia Plaskett


History of Cannabis

Friday, June 17, 2022

 History of Cannabis

Cannabis is thought to be one of the oldest cultivated crops. Thought to originate in what is now Mongolia and Siberia, ancient cultures migrated the plant all over the western world. Today, cannabis can be found growing wild in any warm climate, although it’s not common in many areas. The plant is not only unique in its medicinal and reactional uses, but its fibers also serve as a material for textiles, robes, sails, and other building materials. Its affects, adaptability and fast growth period have enticed humans for roughly 12,000 thousand of years.

Ancient World

The earliest known use of the cannabis plant occurred in ancient China where people used the plant for its medicinal effects and to make hemp products. The Chinese utilized every part of the plant, including the roots. Plants grown for fibers (hemp) were used for industrial products and the seeds used for food and oils (e.g., grains). Seeds have been found in tombs too, indicating a cultural or spiritual significance. By 100 AD, China recognized over 100 medicinal uses for cannabis.

China wasn’t the only ancient society to use cannabis for its many benefits; a notable Egyptian mummy, Ramses II, was found with cannabis pollen sprinkled among him. Ancient Egyptians were known to use cannabis for sore eyes and cataracts. Scrolls found from roughly 2000 BC suggest using cannabis for medicinal uses.

Cannabis was introduced to India around 1000 BC. The people of India created a medicinal drink called “bhang” which was a mixture of cannabis, milk and other ingredients. Bhang is still consumed today. Even in religion, the Hindu god Shive rested under a cannabis plant and ate its leaves after an argument with the family. The Vedas, an old Hindu text, refers to cannabis as one of five sacred plants, with a guardian angel in its leaves.

Eurasian nomads, called Scythians, are thought to be responsible for bringing cannabis to present day Germany from the Altai mountains in Central and East Asia. Greek writer Herodotus recorded observing the Scythians using cannabis in 440 BC, describing the burning of the cannabis on hot stones creating a bath of smoke and shouting for joy. Around 200 BC, the Greek followed other cultures by using cannabis for medicinal purposes. Cannabis was introduced to Britain in the 5th century, likely by Vikings.

The New World

 Napoleon’s troops introduced cannabis to France after discovering hashish in Egypt. It grew in popularity in the 19th century where it was widely used for medicinal purposes for many illnesses and ailments in both Britain and France. Queen Victoria even used cannabis to relieve menstrual pain. The popularity for medicinal use diminished when the syringe was invented. Since cannabis cannot be dissolved, it cannot be injected, resulting in a slower reaction time compared to modern, injectable drugs.

Colonizers introduced cannabis and hemp to the Americas during the mid-1500s when the Spanish encouraged farmers to cultivate the crop; the English colonizers that settled in Jamestown cultivated the plant for its many uses. The English required cannabis to be grown by farmers in Virginia, Massachusetts and Connecticut during the early 1600s, and during the mid-1700s, California, a colony in Spain, and Mexico, were known for growing cannabis. The United States Pharmacopeia approved cannabis for treatment for a number of medical troubles from rabies to alcoholism, and to everything in between.

Prohibition

Cannabis was widely grown across the Americas for hundreds of years until the 1900s. The Mexican revolution in 1910 pushed an influx of immigrants to the southwestern United States. Mexico provided the perfect climate for cannabis growth, making it very popular among its people; thus, the influx of Mexican immigrants to the US also brought cannabis. This sparked fear among paper and cloth producers, as company owners were threatened by the possibility that Mexican immigrants could cultivate and use hemp to compete with their business. The wealthy owners produced anti-immigrant and anti-cannabis propagation, dubbing cannabis as an “evil weed”. This propagation would change how the world views cannabis still to this day.

Prohibition of cannabis kick started during the early 1900s, around the time anti-immigration culture was growing. Utah was the first state to outlaw the plant entirely in 1915 with 29 states following by 1931. An international drug conference in 1928 lead the UK and many other countries to create legislation against possession, use and cultivation of cannabis and hemp. By the 1930s, mass unemployment left Americans wanting to point fingers, which arguably sparked the mass anti-immigration culture, with traces still found in todays society.

By 1937, the federal “Marijuana Tax Act” criminalized possession in America, classifying cannabis under the Drug Enforcement Administration. The countries who didn’t follow the UK in 1928 quickly followed the US in criminalization. These laws didn’t stop people from experimenting with cannabis and other drugs, with the “flower power” era during the 1960s, cannabis and other recreational drug use soared. President Richard Nixon started the “War on Drugs” program during the 1970s, which classified cannabis as a Schedule 1 drug alongside heroin, LSD and ecstasy. The Drug Awareness Resistance Education (D.A.R.E) program in schools was designed to educated children about the dangers of drugs. These programs have been widely criticized for spreading misinformation and creating generations of North Americans who know little about safe drug use, while still using drugs recreationally and illegally.

Modern Legislation

The fear-based education and culture was prominent around the world until 1993 when the Netherlands legalized cannabis for medicinal purposes and decriminalized it for personal and recreational use. Since then, countries have slowly pulled back their prohibition laws due to cannabis’ many benefits. California legalized cannabis for patients with severe or chronic illness in 1996. In 2001, Portugal followed by becoming the first European country (and one of the first in the world) to decriminalize possession of cannabis and all other drugs. Possibly the biggest country to make such a drastic change was Canada in 2018, who allowed adults to use cannabis for recreational use, in addition to medicinal use, which was approved with a prescription years prior.

Cannabis has a long, deeply routed history. Within a short 50 years, thousands of years of spiritual, cultural and medicinal use of cannabis was erased. A false narrative created by a small group of powerful people led to harsh attitudes that are still very much present. To this day, there are many countries where possession of cannabis is highly illegal, and people have undergone harsh punishments for associating with cannabis. There are many countries in the works of legalization, but even more where legalization seems centuries away.

            All in all, cannabis legalization has proven to benefit those with medicinal needs, such as children with seizures, pain management, etc., and countries are hopeful the decriminalization of cannabis will reduce the use of black markets and potential overdoses or issues (i.e., mixing drugs with fentanyl, etc.).  


Prepared By: Haley Browne

Managing a Substrate-Based Production System

Friday, May 27, 2022

The shift from soil to substrate is more involved than simply switching the grow medium and hoping for the best. Every base growing material is going to have different physical and chemical properties that impact the way it behaves in production. As a result, management is going to vary across soilless substrates. Despite the differences across alternative grow media, there are a handful of things, however, which do hold true when switching out of soil-based crop production


Irrigation Management is Crucial. 

Managing the water demands of a crop that is restricted to its container is very different than that same crop being grown in 'infinite' soil. The biggest differences you will see is the rate at which it dries out - a 4L pot has a significantly decreased ability to hold moisture compared to a soil-based farm. On that same note, the ability to drain water is also different when producing in a restricted volume of growing media. The potential for over-saturation of the growing media, as well as the heightened risk of salt accumulation, are also important characteristics to be aware of. 

Growing in a container is going to result in a smaller root volume on a plant, which is going to impact the ability to uptake water. For containerized crops we see that water needs to be more readily available for uptake compared to a soil based system. This metric is referred to as 'moisture tension'. Moisture tension can be measured a handful of ways (tensiometers, squeeze tests, capacitance probes), and it is important to recognize that the target moisture tension values are going to be different than a soil-based system. The ideal moisture tension for peat-based tomatoes runs from 1 to -5kPa, which is higher than what a field producer would aim for. By maintaining the moisture tension in this range, the plant roots have consistent access to water that is readily available for uptake. Values higher than this indicate a substrate that is too wet, which will limit air pockets in the media and increase the risk of disease in the roots. Values lower than this mean that your substrate is running too dry for your crop. The miniaturized root system is unable to extract water from the pore spaces in the media, and plant growth will be immediately impacted. 

Fertilizer Management Regime

Soilless substrate inherently contains very little, if not zero, baseline nutrition for your crop. While soil systems rely on pre-treatment of the soil and scattered nutrient applications through the season, a substrate-grown crop should be fertigated multiple times per day. By combining your irrigation and soluble fertilizer applications, you can be sure that the crop is getting the right amount of nutrients to sustain healthy and productive plant growth. 

What happens if I only fertigate once a day, and the remainder of the crop receives straight water? Any fertilizer that has been applied will be significantly diluted, if not completely run out of your substrate by selectively applying fertilizer through the day. Consistency bodes well for containerized crops in producing a healthy and productive root system, so save yourselves the trouble and plan accordingly for your daily watering regime. 

The soluble fertilizers that are being introduced into your system should be monitored on a regular basis. Daily checks of the EC and pH of the water that is being fed to your crop will ensure that your dosing system is working properly and that your fertilizer mix was diluted accordingly. These systems can see change on a daily basis, so it is important to stay on top of it to maintain healthy plant growth.
Speaking of pH....the target values for a soilless substrate are going to be lower than what you are aiming for in a soil-based system. While this depends on what the base material of your growing media is, you can anticipate that the pH of the fertigation solution should be somewhere in the 5.4-5.8 range.

If you are interested in learning more about managing a substrate-based production system, click here to check out our new factsheet. If you have any questions that were not addressed here, don't hesitate to reach out and we will be happy to talk to you about your production setup.

Posted by: Talia Plaskett


PREVIOUS Bloom to Bud Posts